

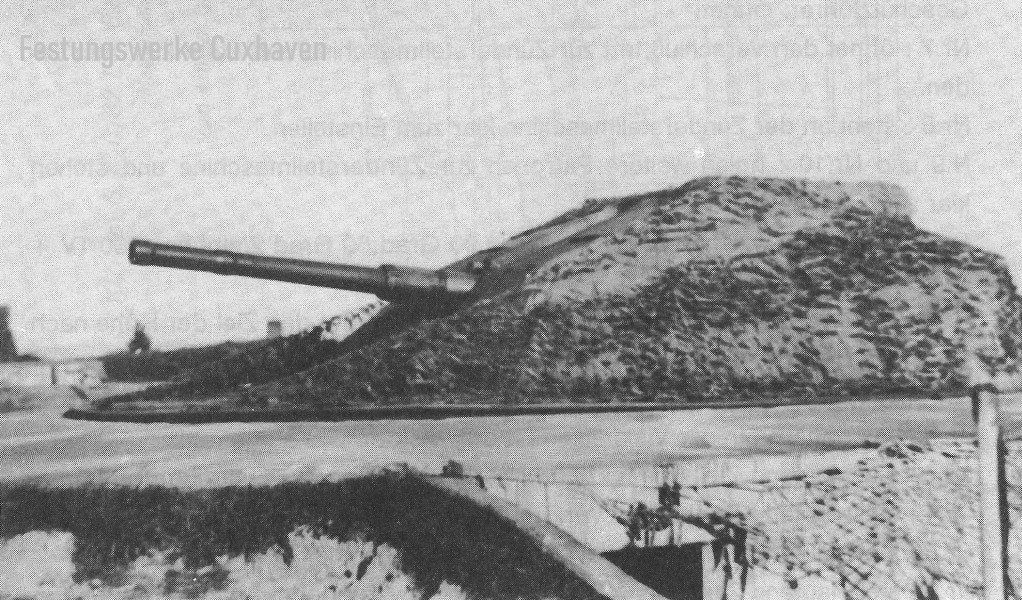
The guns of the battery
Part of the gun training involved learning the following description of the gun by heart. It read: The gun we are being trained on is a 10.5 cm Flak SK,C 32, nL in 8.8 cm M.-P.-L,C, 30, D. That means: 10.5 cm is the caliber of the gun. Flak means: anti-aircraft gun. SK means: quick-loading gun, C 30 is the year the barrel was designed. nL means: new barrel construction with loading device, in 8.8 cm MPL means: The gun stands on a firmly screwed base and can be swiveled horizontally by 360 degrees in each direction, C 30 is the year the pivot base was designed, D. means: ceiling protection shield. The main parts of the gun are: the barrel with base or breech block, the cradle with recoil brake and recoil device, the cradle support, the pivot base with elevation ring, the elevation and windage adjustment machine, the sighting device and the protective cover shield. The barrel: The cartridge is ignited in the barrel and the projectile is given direction and movement. The parts of the barrel are: the base or breech block, the mother barrel with union nut, the casing tube and the muzzle piece. The casing tube is pushed into the mother barrel from behind and rests with its rear surface against the threaded ring. The muzzle piece is pushed into the mother barrel from the front and rests with its rear surface against the front surface of the casing tube. The union nut connects all parts into a whole. Seals are attached to the union nut to prevent dirt and water from entering. Wedges are attached to the mother barrel and muzzle piece to prevent the grooves and fields from twisting relative to each other. Furthermore, wedges are fitted between the casing and the mother tube to prevent the two parts (casing and muzzle) from twisting. We distinguish between an outside and an inside of the tube. The outside of the tube is divided into the base or breech piece, the cylindrical part and the long field. The base or breech piece is pushed onto the mother tube from behind and is held in place by the bronze screw ring, which is secured by a toothed segment. The tube rests and slides in the cradle with the cylindrical part. It also tapers off to the long field. On the long field there are two bead-like reinforcements for attaching a VO measuring device. Furthermore, there are vertical and horizontal notches on the muzzle surface for tensioning a crosshair. The 8th, 16th, 24th and 32nd grooves are also indicated so that a rolled-out groove can be determined. The inside of the tube is divided into the cartridge chamber, the transition cone and the long, drawn part. The cartridge chamber is smooth and machined to suit the cartridge. The transition cone is a flattening of the fields towards the rear and enables better insertion of the guide material into the grooves. 32 grooves are cut into the long rifled part, which rotate from left to right and give the projectile a right-hand twist. The distance from the field to the opposite field is 10.5 cm and gives the caliber of the gun. The bolt: The bolt of the 10.5 is a self-cocking falling block bolt with a device for re-cocking. It opens when the barrel has not yet fully advanced, is simultaneously cocked and ejects the cartridge case. When loading, it closes automatically. A safety device prevents the gun from being accidentally fired when it is ready to fire, and also prevents the bolt from opening. If something goes wrong, I can re-cock the bolt without opening it by pulling the re-cocking lever backwards. Replacing the striking, cocking, re-cocking, trigger safety and ejection device, as well as removing the entire bolt part, can be done without any tools. The main parts of the bolt are: bolt mover, movement device, striking, cocking, re-cocking, safety, ejector device and bolt wedge.
Harald Schönemann
Gun 3Photo source: Marinehelfer in the Kugelbake battery / 1995
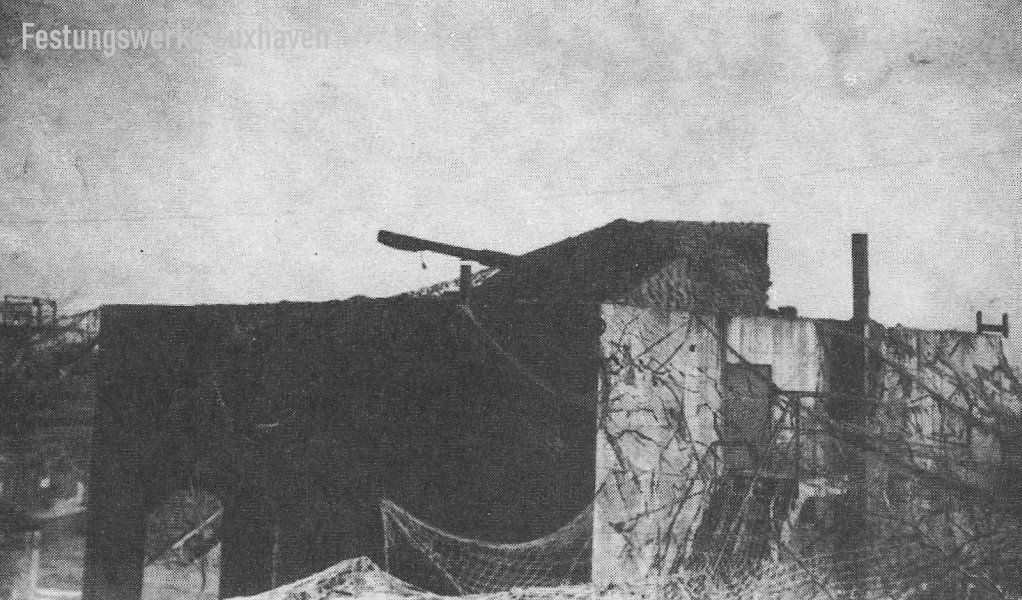
Gun 4 on its concrete boiler bedPhoto source: Marinehelfer in the Kugelbake battery / 1995
Artillery drill
A set of rules was used for gun drills. The individual functions had to be carried out in as short a time as possible so that the battery's salvos could be fired in quick succession. Gun operations were divided into numbers. The activities had to mesh together without delay. Only 5 seconds were available for this, because that was the salvo cycle. Drill rules. Gun commander: With practical instruction, sections of anti-aircraft grenades on command. No.7: grasps the hand lever of the bolt and stands ready to open. No.9 and No.10: call out the type of projectile ordered, fetch cartridges from the detonator and insert them, call "anti-aircraft grenades". Gun commander: Open! No.7: opens the bolt, goes to the detonator and stands ready to load. No.8: stands at the detonator ready to set. No.9 and No.10: fetch more cartridges from the detonator and stand ready to insert. Gun Commander: Target address: Aircraft 90 degrees, 50 degrees target altitude, 1800 TV 1 45 high 20 left 80. "Aim!" No.1: repeats the commanded elevation, intersects the target in terms of altitude, keeps it in the line of sight and reports: "Target acquired!" No.2: repeats the commanded lateral angle, intersects the target in terms of side, keeps it in the line of sight and reports: "Target acquired!" No.3: continuously adjusts target altitude and distance taking the TV into account. No.4: continuously adjusts regulator and wind regulator. No.5: continuously adjusts slider and wind slider. No.8: continuously adjusts target altitude and distance, or fuse running time on the fuse setting machine. Gun Commander: "One salvo!" No.7: takes a set cartridge on the loading command from the detonator setting machine, lets it slide over the left forearm into the loading cavity, makes sure that the detonator does not hit the metal of the barrel and the projectile head does not hit the claws of the ejector and starts with a strong jerk. The hand remains clenched into a fist on the base of the cartridge until it is pushed upwards by the rising bolt, frees itself from the barrel recoil and reports "Closed!" No.9 and No.10: add the cartridges taken from the detonator setting machine. Gun commander: fires. (No.6 calls out "Shot" during drills). No.7: opens the bolt during drills. No.6: catches the cartridge during drills and the case when firing and puts them to one side. Gun commander: "Halt! Battery halt! " No.1: lowers the barrel to zero degrees. No.2: swings the gun into the lashing position. No.3, No.4 and No.5: set all settings to zero. No.7: closes and relaxes the bolt. No.8: sets the dead position on the detonator setting machine. No.9 and No.10: collect the cartridges (when firing: the cases).Harald Schönemann
Detecting aircraft - Aircraft detection service
Our general training also included the ability to quickly and reliably identify aircraft. First, we had to learn the most obvious features. This included determining whether the aircraft was a monoplane or a biplane, determining the number of engines, determining the shape and arrangement of the wings and tail unit, estimating size and speed, and assessing the aircraft's behavior. The following factors made this more difficult: the often high altitude, the increasing standardization of construction, and the camouflage provided by the paintwork. The first step was to identify German aircraft types from pictures and silhouettes. For example, our aircraft types had specific nicknames that made it easier to learn. For example, the Heinkel fighter plane, the He 111 (spade tail unit), or the Dornier Do17 (flying pencil), the Junkers JU 52 and the W 34, which were notable for their clumsiness. The Messerschmidt Me109 (fighter aircraft) and Me 110 (destroyer, mainly night fighter) were also there. Learning the characteristics of the enemy aircraft, both English and American, was just as important. While the Bristol-Blendheim in the old and new form, the Vickers Wellington and the Hamden Hereford (twin-engine long-range bombers) flew in the first years of the war, the four-engine flying fortresses (often without fighter protection) such as the Boeing YB 17, the Lancaster, the Liberator and the Halifax were added later. If you were on duty at a control center, you had to determine as quickly as possible whether a plane was approaching from a German or an enemy aircraft. The following incident showed how important this training was: A corporal was on lookout duty at Flak-Ost. He spotted an enemy plane flying low into Grimmershörnbucht from the direction of Brunsbüttel. Because he was able to spot it quickly, he acted immediately. He opened a 2 cm magazine and fired at the plane alone. As he had recognized the lead angle from a few shots, his subsequent shots were accurate. The plane had already been damaged by anti-aircraft fire, but the battery was credited with the kill. But this incident had consequences: The corporal was awarded the EK, but had to go to "den" for three days because he had fired without permission to fire.